A PHP Error was encountered
Severity: 8192
Message: Creation of dynamic property CI_URI::$config is deprecated
Filename: core/URI.php
Line Number: 101
Backtrace:
File: /var/www/vhosts/doodleflick.co.uk/site/www/index.php
A PHP Error was encountered
Severity: 8192
Message: Creation of dynamic property CI_Router::$uri is deprecated
Filename: core/Router.php
Line Number: 127
Backtrace:
File: /var/www/vhosts/doodleflick.co.uk/site/www/index.php
A PHP Error was encountered
Severity: 8192
Message: Creation of dynamic property Faq::$benchmark is deprecated
Filename: core/Controller.php
Line Number: 82
Backtrace:
File: /var/www/vhosts/doodleflick.co.uk/site/application/controllers/Faq.php
File: /var/www/vhosts/doodleflick.co.uk/site/www/index.php
A PHP Error was encountered
Severity: 8192
Message: Creation of dynamic property Faq::$hooks is deprecated
Filename: core/Controller.php
Line Number: 82
Backtrace:
File: /var/www/vhosts/doodleflick.co.uk/site/application/controllers/Faq.php
File: /var/www/vhosts/doodleflick.co.uk/site/www/index.php
A PHP Error was encountered
Severity: 8192
Message: Creation of dynamic property Faq::$config is deprecated
Filename: core/Controller.php
Line Number: 82
Backtrace:
File: /var/www/vhosts/doodleflick.co.uk/site/application/controllers/Faq.php
File: /var/www/vhosts/doodleflick.co.uk/site/www/index.php
A PHP Error was encountered
Severity: 8192
Message: Creation of dynamic property Faq::$log is deprecated
Filename: core/Controller.php
Line Number: 82
Backtrace:
File: /var/www/vhosts/doodleflick.co.uk/site/application/controllers/Faq.php
File: /var/www/vhosts/doodleflick.co.uk/site/www/index.php
A PHP Error was encountered
Severity: 8192
Message: Creation of dynamic property Faq::$utf8 is deprecated
Filename: core/Controller.php
Line Number: 82
Backtrace:
File: /var/www/vhosts/doodleflick.co.uk/site/application/controllers/Faq.php
File: /var/www/vhosts/doodleflick.co.uk/site/www/index.php
A PHP Error was encountered
Severity: 8192
Message: Creation of dynamic property Faq::$uri is deprecated
Filename: core/Controller.php
Line Number: 82
Backtrace:
File: /var/www/vhosts/doodleflick.co.uk/site/application/controllers/Faq.php
File: /var/www/vhosts/doodleflick.co.uk/site/www/index.php
A PHP Error was encountered
Severity: 8192
Message: Creation of dynamic property Faq::$exceptions is deprecated
Filename: core/Controller.php
Line Number: 82
Backtrace:
File: /var/www/vhosts/doodleflick.co.uk/site/application/controllers/Faq.php
File: /var/www/vhosts/doodleflick.co.uk/site/www/index.php
A PHP Error was encountered
Severity: 8192
Message: Creation of dynamic property Faq::$router is deprecated
Filename: core/Controller.php
Line Number: 82
Backtrace:
File: /var/www/vhosts/doodleflick.co.uk/site/application/controllers/Faq.php
File: /var/www/vhosts/doodleflick.co.uk/site/www/index.php
A PHP Error was encountered
Severity: 8192
Message: Creation of dynamic property Faq::$output is deprecated
Filename: core/Controller.php
Line Number: 82
Backtrace:
File: /var/www/vhosts/doodleflick.co.uk/site/application/controllers/Faq.php
File: /var/www/vhosts/doodleflick.co.uk/site/www/index.php
A PHP Error was encountered
Severity: 8192
Message: Creation of dynamic property Faq::$security is deprecated
Filename: core/Controller.php
Line Number: 82
Backtrace:
File: /var/www/vhosts/doodleflick.co.uk/site/application/controllers/Faq.php
File: /var/www/vhosts/doodleflick.co.uk/site/www/index.php
A PHP Error was encountered
Severity: 8192
Message: Creation of dynamic property Faq::$input is deprecated
Filename: core/Controller.php
Line Number: 82
Backtrace:
File: /var/www/vhosts/doodleflick.co.uk/site/application/controllers/Faq.php
File: /var/www/vhosts/doodleflick.co.uk/site/www/index.php
A PHP Error was encountered
Severity: 8192
Message: Creation of dynamic property Faq::$lang is deprecated
Filename: core/Controller.php
Line Number: 82
Backtrace:
File: /var/www/vhosts/doodleflick.co.uk/site/application/controllers/Faq.php
File: /var/www/vhosts/doodleflick.co.uk/site/www/index.php
A PHP Error was encountered
Severity: 8192
Message: Creation of dynamic property Faq::$db is deprecated
Filename: core/Loader.php
Line Number: 396
Backtrace:
File: /var/www/vhosts/doodleflick.co.uk/site/application/controllers/Faq.php
File: /var/www/vhosts/doodleflick.co.uk/site/www/index.php
A PHP Error was encountered
Severity: 8192
Message: Creation of dynamic property CI_DB_mysqli_driver::$failover is deprecated
Filename: database/DB_driver.php
Line Number: 371
Backtrace:
File: /var/www/vhosts/doodleflick.co.uk/site/application/controllers/Faq.php
File: /var/www/vhosts/doodleflick.co.uk/site/www/index.php
A PHP Error was encountered
Severity: 8192
Message: Creation of dynamic property User_library::$ci is deprecated
Filename: libraries/User_library.php
Line Number: 8
Backtrace:
File: /var/www/vhosts/doodleflick.co.uk/site/application/libraries/User_library.php
File: /var/www/vhosts/doodleflick.co.uk/site/application/controllers/Faq.php
File: /var/www/vhosts/doodleflick.co.uk/site/www/index.php
A PHP Error was encountered
Severity: 8192
Message: Creation of dynamic property Faq::$user_model is deprecated
Filename: core/Loader.php
Line Number: 358
Backtrace:
File: /var/www/vhosts/doodleflick.co.uk/site/application/libraries/User_library.php
File: /var/www/vhosts/doodleflick.co.uk/site/application/controllers/Faq.php
File: /var/www/vhosts/doodleflick.co.uk/site/www/index.php
A PHP Error was encountered
Severity: 8192
Message: Creation of dynamic property Faq::$user_library is deprecated
Filename: core/Loader.php
Line Number: 1283
Backtrace:
File: /var/www/vhosts/doodleflick.co.uk/site/application/controllers/Faq.php
File: /var/www/vhosts/doodleflick.co.uk/site/www/index.php
A PHP Error was encountered
Severity: Warning
Message: ini_set(): Session ini settings cannot be changed after headers have already been sent
Filename: Session/Session.php
Line Number: 282
Backtrace:
File: /var/www/vhosts/doodleflick.co.uk/site/application/controllers/Faq.php
File: /var/www/vhosts/doodleflick.co.uk/site/www/index.php
A PHP Error was encountered
Severity: Warning
Message: session_set_cookie_params(): Session cookie parameters cannot be changed after headers have already been sent
Filename: Session/Session.php
Line Number: 289
Backtrace:
File: /var/www/vhosts/doodleflick.co.uk/site/application/controllers/Faq.php
File: /var/www/vhosts/doodleflick.co.uk/site/www/index.php
A PHP Error was encountered
Severity: Warning
Message: ini_set(): Session ini settings cannot be changed after headers have already been sent
Filename: Session/Session.php
Line Number: 304
Backtrace:
File: /var/www/vhosts/doodleflick.co.uk/site/application/controllers/Faq.php
File: /var/www/vhosts/doodleflick.co.uk/site/www/index.php
A PHP Error was encountered
Severity: Warning
Message: ini_set(): Session ini settings cannot be changed after headers have already been sent
Filename: Session/Session.php
Line Number: 314
Backtrace:
File: /var/www/vhosts/doodleflick.co.uk/site/application/controllers/Faq.php
File: /var/www/vhosts/doodleflick.co.uk/site/www/index.php
A PHP Error was encountered
Severity: Warning
Message: ini_set(): Session ini settings cannot be changed after headers have already been sent
Filename: Session/Session.php
Line Number: 315
Backtrace:
File: /var/www/vhosts/doodleflick.co.uk/site/application/controllers/Faq.php
File: /var/www/vhosts/doodleflick.co.uk/site/www/index.php
A PHP Error was encountered
Severity: Warning
Message: ini_set(): Session ini settings cannot be changed after headers have already been sent
Filename: Session/Session.php
Line Number: 316
Backtrace:
File: /var/www/vhosts/doodleflick.co.uk/site/application/controllers/Faq.php
File: /var/www/vhosts/doodleflick.co.uk/site/www/index.php
A PHP Error was encountered
Severity: Warning
Message: ini_set(): Session ini settings cannot be changed after headers have already been sent
Filename: Session/Session.php
Line Number: 317
Backtrace:
File: /var/www/vhosts/doodleflick.co.uk/site/application/controllers/Faq.php
File: /var/www/vhosts/doodleflick.co.uk/site/www/index.php
A PHP Error was encountered
Severity: Warning
Message: ini_set(): Session ini settings cannot be changed after headers have already been sent
Filename: Session/Session.php
Line Number: 375
Backtrace:
File: /var/www/vhosts/doodleflick.co.uk/site/application/controllers/Faq.php
File: /var/www/vhosts/doodleflick.co.uk/site/www/index.php
A PHP Error was encountered
Severity: Warning
Message: session_set_save_handler(): Session save handler cannot be changed after headers have already been sent
Filename: Session/Session.php
Line Number: 110
Backtrace:
File: /var/www/vhosts/doodleflick.co.uk/site/application/controllers/Faq.php
File: /var/www/vhosts/doodleflick.co.uk/site/www/index.php
A PHP Error was encountered
Severity: Warning
Message: session_start(): Session cannot be started after headers have already been sent
Filename: Session/Session.php
Line Number: 143
Backtrace:
File: /var/www/vhosts/doodleflick.co.uk/site/application/controllers/Faq.php
File: /var/www/vhosts/doodleflick.co.uk/site/www/index.php
A PHP Error was encountered
Severity: 8192
Message: Creation of dynamic property Faq::$session is deprecated
Filename: core/Loader.php
Line Number: 1283
Backtrace:
File: /var/www/vhosts/doodleflick.co.uk/site/application/controllers/Faq.php
File: /var/www/vhosts/doodleflick.co.uk/site/www/index.php
A PHP Error was encountered
Severity: 8192
Message: Creation of dynamic property Faq::$User_model is deprecated
Filename: core/Loader.php
Line Number: 358
Backtrace:
File: /var/www/vhosts/doodleflick.co.uk/site/application/controllers/Faq.php
File: /var/www/vhosts/doodleflick.co.uk/site/www/index.php
A PHP Error was encountered
Severity: 8192
Message: Creation of dynamic property CI_Loader::$load is deprecated
Filename: core/Loader.php
Line Number: 931
Backtrace:
File: /var/www/vhosts/doodleflick.co.uk/site/application/controllers/Faq.php
File: /var/www/vhosts/doodleflick.co.uk/site/www/index.php
A PHP Error was encountered
Severity: 8192
Message: Creation of dynamic property CI_Loader::$benchmark is deprecated
Filename: core/Loader.php
Line Number: 931
Backtrace:
File: /var/www/vhosts/doodleflick.co.uk/site/application/controllers/Faq.php
File: /var/www/vhosts/doodleflick.co.uk/site/www/index.php
A PHP Error was encountered
Severity: 8192
Message: Creation of dynamic property CI_Loader::$hooks is deprecated
Filename: core/Loader.php
Line Number: 931
Backtrace:
File: /var/www/vhosts/doodleflick.co.uk/site/application/controllers/Faq.php
File: /var/www/vhosts/doodleflick.co.uk/site/www/index.php
A PHP Error was encountered
Severity: 8192
Message: Creation of dynamic property CI_Loader::$config is deprecated
Filename: core/Loader.php
Line Number: 931
Backtrace:
File: /var/www/vhosts/doodleflick.co.uk/site/application/controllers/Faq.php
File: /var/www/vhosts/doodleflick.co.uk/site/www/index.php
A PHP Error was encountered
Severity: 8192
Message: Creation of dynamic property CI_Loader::$log is deprecated
Filename: core/Loader.php
Line Number: 931
Backtrace:
File: /var/www/vhosts/doodleflick.co.uk/site/application/controllers/Faq.php
File: /var/www/vhosts/doodleflick.co.uk/site/www/index.php
A PHP Error was encountered
Severity: 8192
Message: Creation of dynamic property CI_Loader::$utf8 is deprecated
Filename: core/Loader.php
Line Number: 931
Backtrace:
File: /var/www/vhosts/doodleflick.co.uk/site/application/controllers/Faq.php
File: /var/www/vhosts/doodleflick.co.uk/site/www/index.php
A PHP Error was encountered
Severity: 8192
Message: Creation of dynamic property CI_Loader::$uri is deprecated
Filename: core/Loader.php
Line Number: 931
Backtrace:
File: /var/www/vhosts/doodleflick.co.uk/site/application/controllers/Faq.php
File: /var/www/vhosts/doodleflick.co.uk/site/www/index.php
A PHP Error was encountered
Severity: 8192
Message: Creation of dynamic property CI_Loader::$exceptions is deprecated
Filename: core/Loader.php
Line Number: 931
Backtrace:
File: /var/www/vhosts/doodleflick.co.uk/site/application/controllers/Faq.php
File: /var/www/vhosts/doodleflick.co.uk/site/www/index.php
A PHP Error was encountered
Severity: 8192
Message: Creation of dynamic property CI_Loader::$router is deprecated
Filename: core/Loader.php
Line Number: 931
Backtrace:
File: /var/www/vhosts/doodleflick.co.uk/site/application/controllers/Faq.php
File: /var/www/vhosts/doodleflick.co.uk/site/www/index.php
A PHP Error was encountered
Severity: 8192
Message: Creation of dynamic property CI_Loader::$output is deprecated
Filename: core/Loader.php
Line Number: 931
Backtrace:
File: /var/www/vhosts/doodleflick.co.uk/site/application/controllers/Faq.php
File: /var/www/vhosts/doodleflick.co.uk/site/www/index.php
A PHP Error was encountered
Severity: 8192
Message: Creation of dynamic property CI_Loader::$security is deprecated
Filename: core/Loader.php
Line Number: 931
Backtrace:
File: /var/www/vhosts/doodleflick.co.uk/site/application/controllers/Faq.php
File: /var/www/vhosts/doodleflick.co.uk/site/www/index.php
A PHP Error was encountered
Severity: 8192
Message: Creation of dynamic property CI_Loader::$input is deprecated
Filename: core/Loader.php
Line Number: 931
Backtrace:
File: /var/www/vhosts/doodleflick.co.uk/site/application/controllers/Faq.php
File: /var/www/vhosts/doodleflick.co.uk/site/www/index.php
A PHP Error was encountered
Severity: 8192
Message: Creation of dynamic property CI_Loader::$lang is deprecated
Filename: core/Loader.php
Line Number: 931
Backtrace:
File: /var/www/vhosts/doodleflick.co.uk/site/application/controllers/Faq.php
File: /var/www/vhosts/doodleflick.co.uk/site/www/index.php
A PHP Error was encountered
Severity: 8192
Message: Creation of dynamic property CI_Loader::$db is deprecated
Filename: core/Loader.php
Line Number: 931
Backtrace:
File: /var/www/vhosts/doodleflick.co.uk/site/application/controllers/Faq.php
File: /var/www/vhosts/doodleflick.co.uk/site/www/index.php
A PHP Error was encountered
Severity: 8192
Message: Creation of dynamic property CI_Loader::$user_model is deprecated
Filename: core/Loader.php
Line Number: 931
Backtrace:
File: /var/www/vhosts/doodleflick.co.uk/site/application/controllers/Faq.php
File: /var/www/vhosts/doodleflick.co.uk/site/www/index.php
A PHP Error was encountered
Severity: 8192
Message: Creation of dynamic property CI_Loader::$user_library is deprecated
Filename: core/Loader.php
Line Number: 931
Backtrace:
File: /var/www/vhosts/doodleflick.co.uk/site/application/controllers/Faq.php
File: /var/www/vhosts/doodleflick.co.uk/site/www/index.php
A PHP Error was encountered
Severity: 8192
Message: Creation of dynamic property CI_Loader::$session is deprecated
Filename: core/Loader.php
Line Number: 931
Backtrace:
File: /var/www/vhosts/doodleflick.co.uk/site/application/controllers/Faq.php
File: /var/www/vhosts/doodleflick.co.uk/site/www/index.php
A PHP Error was encountered
Severity: 8192
Message: Creation of dynamic property CI_Loader::$User_model is deprecated
Filename: core/Loader.php
Line Number: 931
Backtrace:
File: /var/www/vhosts/doodleflick.co.uk/site/application/controllers/Faq.php
File: /var/www/vhosts/doodleflick.co.uk/site/www/index.php
Toy - How To
Using the Toy - overview
Create an animated doodle in three easy steps.
First, draw a doodle and click the next
> button.
more info
Next, draw another doodle and, if you want more, press
> again
navigation
Finally, when two (or more) doodles are drawn, press the
start button.
This calculates the tweens and plays them back as a standard stop frame animation.
Note: Each doodle is a
keyframe . Intermediate doodles (tweens) are constructed
by the application for playback.
An animated doodle (yippee!)
During playback, the start button becomes a pause (resume) < >
Editing - A
To edit the flick click the
edit
This stops playback and returns to "capture" mode (drawing) and displays the last doodle.
Editing - B
During capture the
undo
button removes the last curve of the current doodle.
clear clears the current doodle and
reset wipes the entire
Flick .
Settings - A
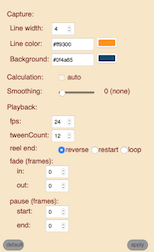
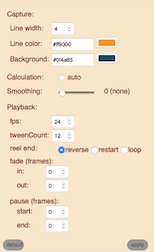
The display and playback properties of the Flick are controlled in the settings panel,
Settings - B
After any changes are made you'll need to click on
apply
Settings - C
In the
Capture section, line width and color, and background color are self-explanatory.
The gallery
There are a number of doodles and flicks available on the gallery panel.
Doodles add a single doodle onto the current canvas, leaving any curves already there.
Flicks replace all the frames, and are ready to play.
Bar
f


